Pop music from another age and the machines that played it - A blog by DeBence Antique Music Word
Wednesday, July 4, 2018
NEW PHONE SYSTEM
Our Centranet phone system was three generations behind. Parts were no longer available and it only covered two of the four floors of the building.
This year's major project was updating the system. This was made more urgent, when one of the three existing hand sets failed.
With a grant from the Rees Trust, we were able to get a modern ESI system installed in late May. We now have seven hand sets, giving coverage on all four floors.
This is the basement phone.
Wednesday, June 27, 2018
RECORD STORAGE PART 2
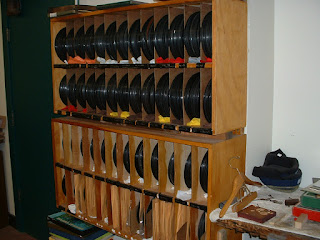
After getting the frame parts ready, assembly started and we soon had the rough rack done.
We made two identical 2 shelf units. Wall mounting was next. A support ledge was lag screwed to the wall, the completed frame was positioned on it and the top was anchored. The second rack was installed above the lower one.
Then the dividers were installed and the trim nailed in place.
Some stain touch up and we were ready to start putting the records in place.
Of course, getting the records off of the floor and into the proper place alphabetically will involve a lot of work, but we are on the way.
Wednesday, June 20, 2018
RECORD STORAGE PART 1
We have thousands of 78 RPM records which were originally stored in cardboard boxes. That makes it hard to find one, even if you know which box it is in, so we built wall racks and arranged them alphabetically.
We keep getting more and recently have had a lot of them on the floor in boxes.
Thus it was time to make more wall racks. We had a good empty space next to the existing racks for a place to put it.
A grant from Home Depot provided the necessary plywood. We then did the proper millwork to get the parts ready and we were then ready to begin making a new wall rack.
Wednesday, June 13, 2018
MASON HAMLIN STYLE S
We just received the donation of a Mason Hamlin Reed Organ style S. It was built in 1885 or 86 and is a quality machine. It used a lot of mahogany and the rollers are metal rather than the standard wood.
The top cover is hinged with props and is opened for more volume. At some point, we think the cover was opened and allowed to fall over the back of the organ. It can only move 180 degrees before it catches on the rear side and apparently it split the rear cover. We glued it back together and will put a chain stop on the lid, so that it does not happen again.
One of the front medallions is missing and the other was broken. We glued the pieces back together, then glued the medallion back in place.
The organ plays weakly and probably has leaks in the pumps or reservoir which we will likely not try to correct. The finish is in good shape and is original. All in all, this will make a nice addition to our collection of reed organs.
Wednesday, June 6, 2018
VICTOR VV I-90
We just received the donation of a Victrola. As is often true, it needed some work but we are delighted to have one that was missing from the collection.
The mechanical repairs turned out to be easy. The real challenge was the case.
Made in 1927, this model is the least expensive of the Orthophonic series introduced in 1927, designed to play the new electrically recorded 78 RPM discs. It sold for $75 when new. There are not many survivors in good condition, because the veneer used was not well glued and often fails when exposed to moisture. This one was no exception and had a lot of loose veneer.
The first step in repair is to remove the base.
Then the loose veneer must be reglued.
Of course some cleaning and wax needs to be applied. A new cloth for the speaker outlet is a must. When done, we have a fine addition to the collection.
Wednesday, May 30, 2018
MAKING AN ORCHESTRION PART 8
As we told you in Part 7, we put the top shelf back in the piano and after getting the test roll in place, discovered a time consuming result of POOR PLANNING.
We connected the tracker bar, but without considering that the roll drive works from the back side of the paper. Thus we have the whole tracker bar tubing reversed side to side. This means that we have to take the shelf out and retube the whole tracker bar. Not a technically difficult job, but time consuming and very embarrassing.
Wednesday, May 23, 2018
TOM THUMB REPAIR PART 8
As 2017 progressed, the Tom Thumb Player Piano lost it's enthusiasm and by the time we closed for the season, it was ready to be worked on.
Some jobs just hate to be finished. After the unglued action was fixed, tuning was the next step. While tuning, we broke a treble string. While replacing it, we undid the wrong mating string, so we ended up replacing 2 strings. Then at the bottom end of the scale, we broke a wound bass string, so we had to order a new one, made as a duplicate from Schaff.
In order to install it, we had to take the pump out to get at the bottom anchor point. Then it turned out that the tuning pin would not hold, so it had to be removed and the hole shimmed.
Well, it is back together now, ready for final tuning. Of course, we might break another string doing that.
Wednesday, May 16, 2018
MAKING AN ORCHESTRION PART 7
The piano we chose for this project is a 1909 Weber. We have put the top shelf back in the piano and are about to test the piano playing part.
I got the test roll and discovered that the tube it is mounted on is undersized. I unrolled it, made a correct sized tube and remounted the test roll.
Then I found that we have an interference between the moveable mount and the spring loaded plunger will not retract far enough to put the test roll into the roll drive.
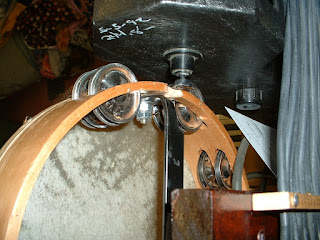
I took the tambourine off, ground the necessary clearance and remounted it. Now we are ready to try the test roll.
Wednesday, May 9, 2018
TOM THUMB REPAIR PART 7
As 2017 progressed, the Tom Thumb Player Piano lost it's enthusiasm and by the time we closed for the season, it was ready to be worked on.
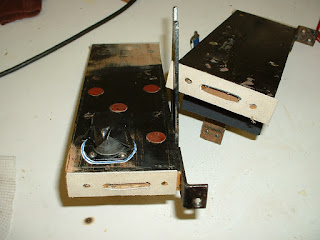
There has been a small leak in the shutoff valve which I could not find. The back cover which holds the pouch has been modified and has motor cloth patches on the back, so I decided to make a new section. The center of the photo shows the old pouch holder. The right side shows the new part before cutting it to size.
There will be no unexplained leaks through the wood after we seal it.
Wednesday, May 2, 2018
Making an Orchestrion Part 6
The piano we chose for this project is a 1909 Weber. We have the upper
section placement worked out. We think we have everything properly
arranged, so we tubed the parts. This is what it looks like from the rear.
We fully expect that when we put this back in the piano, there will have to be
a few adjustments made, but we are pretty sure this is basically correct.
Wednesday, April 25, 2018
TOM THUMB REPAIR PART 6
As 2017 progressed, the Tom Thumb Player Piano lost it's enthusiasm and by the time we closed for the season, it was ready for some help.
You will remember when we took the pumps out to check them, we found a piece of a piano action in the bottom of the case. Well it is time to fix that. In order to do so, the piano action has to be removed and in order to get to it, the player piano roll drive section has to come out.;
With the roll drive out, the piano action can be removed for the needed repair. The rest of the key striking mechanism is removed and the unglued part can be glued back in place.
Then the parts are reassembled and a few other checks are made and the piano action is reinstalled in the piano.
Wednesday, April 18, 2018
TOM THUMB REPAIR PART 5
As 2017 progressed, the Tom Thumb Player Piano lost it's enthusiasm and by the time we closed for the season, it was ready for some help.
Well, we have all the pump sections checked and repaired as necessary.
The gaskets are glued where the joints come, replacing the silicon sealer used in the last repair. This is a more conventional method, but will probably not seal any better. It will however make the job easier for the next person
After the dry fit and repair of a few stripped screws, the pump is reassembled and ready for putting on the auxiliary control parts.
Wednesday, April 11, 2018
BUILDING EXCITEMENT
The building was erected in 1906 and there have been many changes and additions since then. Never a day goes by without some echoes from our past. On April 3, we had a new issue. The sink on the second floor blew a water line and flooded the area.
From there, the water ran down to the mezzanine and over the telephone Centrix system control box.
From there the water came through the light fixture on the first floor and from there we were able to catch most of the water in pans.
The leak was caught quickly, but it was large, so we got a lot of water in a short time. Of course, besides drying out the wet areas, we lost our phone service from water in the Centrix box. After uncovering the pc board and drying it out, the phone came back in about 1 hour.
Never a dull day at DeBence!
Wednesday, April 4, 2018
TOM THUMB REPAIR PART 4
As 2017 progressed, the Tom Thumb Player Piano lost it's enthusiasm and by the time we closed for the season, it was ready for some help.
Well, removing the pump section damaged the bottom board because of the way it was firmly glued to the frame, so we made a new part and prepared to recover the section.
After duplicating the original hinge section, we have the section ready to recover.
Our intent is to use a more conventional gasket and screw the attachment to the frame. So that the next person will not have the issues we faced, the gasket will be glued to the bottom of the pump section.
Wednesday, March 28, 2018
TOM THUMB REPAIR PART 3
As 2017 progressed, the Tom Thumb Player Piano lost it's enthusiasm and by the time we closed for the season, it was ready for some help.
We seem to be short of air, so the box pump was removed for checking. It seemed weak, so further disassembly for more detailed checks was started.
The last repair involved gluing the individual pumps to the frame, rather than a more conventional gasket system. A cork gasket was firmly glued on both sides, which caused a lot of trouble getting the pump loose and damaged the bottom of the pump, so we had to make some new parts and rebuild the pump.
Wednesday, March 21, 2018
TOM THUMB REPAIR PART 2
As 2017 progressed, the Tom Thumb Player Piano lost it's enthusiasm and by the time we closed for the season, it was ready for some help.
After removing the box pump, we found a piano action part in the bottom of the case.
A little checking identified it as coming from this note.
The fix will be easy as the part has just come unglued and is not broken. The challenge is that in order to get the piano action out, we have to remove all the upper player parts. The piano needs to be tuned, so that will be done when the player parts are out.
Just another of those small jobs that grows as you progress.
Wednesday, March 14, 2018
TOM THUMB REPAIR PART I
As 2017 progressed, the Tom Thumb Player Piano lost it's enthusiasm and by the time we closed for the season, it was barely playing.
In February of 2018, we moved it to the office, where we had some heat and started looking for the problem . The first check was the box pump. It sits in the bottom of the case.
We removed it and started checking. With all the inlets blocked, it could be turned with almost no resistance, indicating a leak or maybe several leaks. So disassembly was started to allow the four sections to be individually checked.
Future installments will tell you what we found.
Wednesday, March 7, 2018
WHICH ROLL IS THIS
A lot of the music rolls in the DeBence collection have seen serious use. The first damage that happens to a roll is often in the leader, done while threading the roll onto the machine. It is easy enough to cut some off for a fresh start and eventually splice a new leader in place.
Often when this is done, the information as to roll number and tune list is cut off and not recopied. At some point when you want a clear identification, it becomes necessary to completely unroll the roll and get the number off the inner end.
To do this, you put it on the roll repair frame and hand crank it to the inner end. You will probably patch a few tears during this process. When you get to the inner end, you are apt to find the roll number on the inside of the roll. Then you need a rollography to tell you the song list.
Wednesday, February 28, 2018
MAKING AN ORCHESTRION PART 5
The piano we chose for this project is a 1909 Weber. We have the upper section placement worked out, now we have to get serious about the lower area.
The vacuum box is placed on the right side against the top.
The xylo valves go on the bottom front. The soft pedal pneumatic goes on the left, tucked about as high as we can get it. The next step will be routing the vacuum hoses and pipes to feed all the instruments.

Subscribe to:
Comments (Atom)


